Overview
Groundhogg relies on scheduled tasks (cron jobs) to send emails, process flows, and handle time-sensitive actions. By default, WordPress uses a “virtual” cron system that only runs when someone visits your site. For more reliable automation, we strongly recommend disabling the internal WordPress cron and setting up real cron jobs on your server.
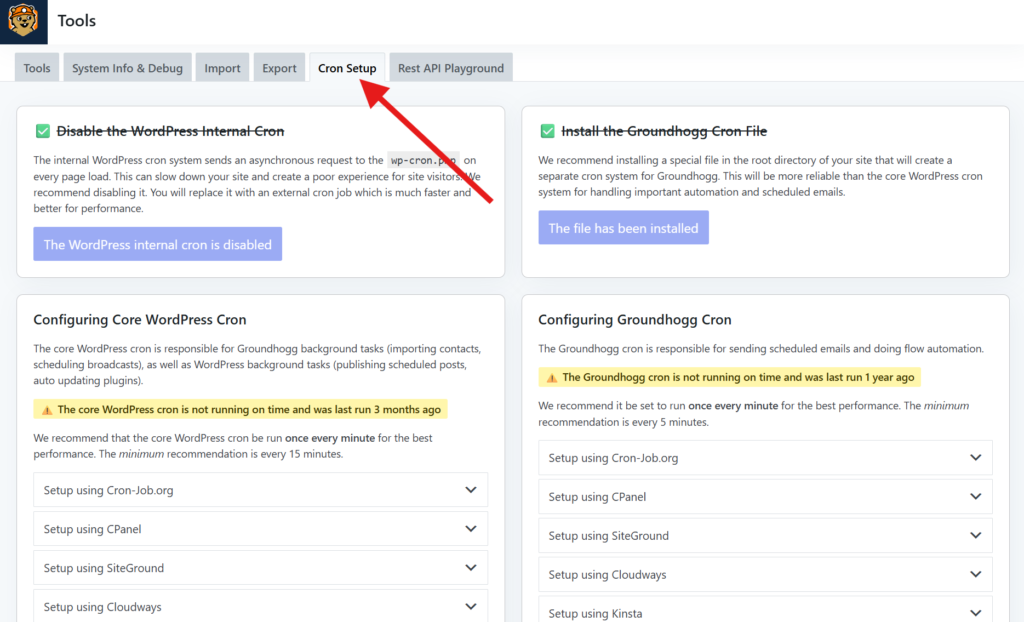
You can find your cron file URLs and site specific instructions in Groundhogg » Tools » Cron Setup on your WordPress site.
Disable WordPress’s Internal Cron
To prevent conflicts, you should disable WordPress’s built-in cron before enabling real cron jobs.
Option 1: Edit wp-config.php
Add the following line to your wp-config.php file, above the line that says /* That's all, stop editing! */:
/* That's all, stop editing! */
define('DISABLE_WP_CRON', true);
Option 2: Use the Groundhogg Setting
Go to Groundhogg » Settings » Misc and enable the option labeled Disable WordPress Cron.
Do cron jobs give you anxiety?
Let our team help you set them up correctly! First time customers can have our team install Groundhogg, import contacts, connect SMTP, and set up cron jobs!
Creating an External Cron Job
Groundhogg provides two endpoints that can be used with your cron system:
/wp-cron.php— the default WordPress cron file, used for background tasks like scheduling posts and emails/gh-cron.php— a dedicated endpoint for the Groundhogg event queue which handles processing flows and broadcasts
We recommend creating external jobs for both.
The gh-cron.php file must be installed by going to Groundhogg » Tools » Cron Setup and clicking Install File
If the gh-cron.php file is not intsalled, Groundhogg will rely on wp-cron.php as a fallback.
Cron-Job.org
Some hosts such as Kinsta and SiteGround are known to block external cron requests, so you must use their provided setup methods.
- Go to cron-job.org and sign up for a free account.
- After logging in, click Create Cronjob.
- In the URL field, enter one of the following:
https://yourdomain.com/wp-cron.phphttps://yourdomain.com/gh-cron.php
- Set the execution schedule to Every 1 minutes.
- Save the job.
Sometimes hosts might block requests from cron-job.org, we recommend communicating with your host to whitelist their IPs.
- 116.203.134.67
- 116.203.129.16
- 23.88.105.37
- 128.140.8.200
cPanel
- Log in to your hosting account and open cPanel.
- Find and click Cron Jobs.
- Under Add New Cron Job, set the schedule to run every 5 minutes:
*/5 * * * * - In the Command field, enter:
wget -q -O - https://yourdomain.com/gh-cron.php >/dev/null 2>&1or if usingwp-cron.php:wget -q -O - https://yourdomain.com/wp-cron.php >/dev/null 2>&1 - Click Add New Cron Job.
SiteGround
If you are hosting with SiteGround it is recommended to use this method.
- Log into your SiteGround Site Tools dashboard.
- Navigate to Dev » Cron Jobs.
- Set the timing to run every 1 minute:
* * * * * - Use this command:
php /home/customer/www/groundhogg.io/public_html/wp-cron.php /dev/null 2>&1 - Click Create.
Cloudways
If you are hosting with Cloudways it is recommended to use this method.
- Log into your Cloudways account and open your application dashboard.
- Go to Cron Job Management under Application Management.
- Click Add New Cron Job.
- Then select
Every minute(* * * * *)from the Common Settings dropdown. - Enter
gh-cron.phporwp-cron.phpinto the Command field. - Save the cron job.
Kinsta
Kinsta does not provide a dedicated UI to manage cron jobs. Instead, you must ask Kinsta support to add them for you, or follow Kinsta’s guide on adding cron jobs via the command line.
If you are asking Kinsta support for help, ask them to “Create a PHP cron job to run the wp-cron.php file in the WordPress root directory every minute.”
FAQs & Debugging Tips
Q: How can I tell if my cron is working?
A: Go to Groundhogg » Tools » Cron Setup. You will see a notice if your cron job is not running on time.
Q: Can I use both gh-cron.php and wp-cron.php?
A: Yes. If you’re not using Groundhogg for all site-wide cron tasks, you may still want to keep wp-cron.php active for other plugins.
Q: Why aren’t my emails sending?
A: This usually means your cron jobs aren’t firing. Double-check that you’ve disabled WordPress cron and correctly set up an external cron job running every minute.
Q: Can I run cron less frequently?
A: We strongly recommend every 1 minute. Less frequent schedules can delay email delivery and automation steps.
Q: Are there plugins to help with this?
A: Yes. Plugins like WP Crontrol can help you monitor scheduled events, but they do not create real cron jobs. You’ll still need to set up a server-level cron or use a service like cron-job.org.
Once your cron jobs are set up and running, Groundhogg can reliably send emails, process flows, and handle everything else on schedule—no traffic required.
Was this helpful?
Let us know if this document answered your question. That’s the only way we can improve.