
Want your Groundhogg emails to stand out and showcase real results? In this tutorial, you’ll learn how to build a dynamic testimonial section for your emails using the Query Loop and the free Strong Testimonials plugin.
We’ll walk you through everything—from creating testimonial posts in WordPress to styling them beautifully inside Groundhogg’s email editor.
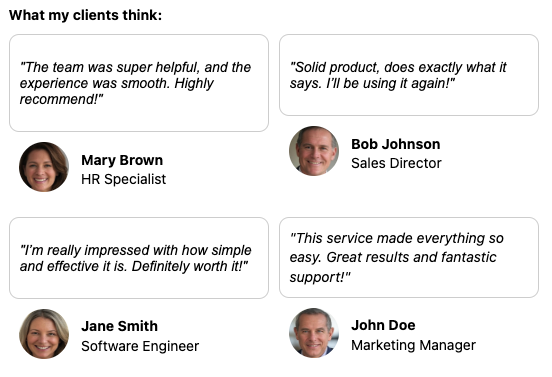
Here’s what you’ll build by the end of this tutorial:
🧑💼 Testimonial content with client names, positions, quotes, and headshots
📬 Fully responsive and clean email layout
What You’ll Need
Before getting started, make sure you have the following:
Basic familiarity with the WordPress dashboard and Groundhogg’s email editor
A WordPress site with Groundhogg and Strong Testimonials installed and activated
Step 1: Set Up the Strong Testimonials Plugin
Install Strong Testimonials
- Navigate to Plugins > Add New in your WordPress dashboard.
- Search for Strong Testimonials, install, and activate it.
Create Testimonial Entries
- After activation, a new menu item called Testimonials appears in the dashboard.
- Go to Testimonials > Add New to create a testimonial.
- For this tutorial, create 4 testimonials with the following fields:
- Title: Client’s name (e.g., “Jane Doe”).
- Excerpt: Client’s position or title (e.g., “Marketing Director”).
- Testimonial Content: The client’s testimonial quote.
- Featured Image: A headshot of the client (used as the thumbnail).
- Save each entry.
Once completed, you’ll see your testimonials listed under Testimonials > All Testimonials.

Step 2: Create a New Email in Groundhogg
Navigate to Emails:
- In your WordPress dashboard, go to Groundhogg > Emails.
- Click Add New to create a new email.
Choose a Template:
- Select the Simple Frame template for a clean, professional look.
- Name the email “Simple Framed – Testimonials” and click Create.

Step 3: Add a Header for the Testimonial Section
Insert a Text Block:
- In the Groundhogg email editor, drag a Text Block into the email editor.
- Type “What My Clients Think:”.
- Highlight the text and click the Bold button in the editor toolbar to emphasize it.

Step 4: Add and Configure the Query Loop Block
Insert the Query Loop Block:
- Drag a Query Loop Block from the block menu and drop it below the Text Block.
- In the Query Loop Settings > Query, select Post Type: Testimonials
- Number of posts: 4
- The Query Loop will dynamically pull and display your testimonials.

Understand Merge Tags:
- The Query Loop uses merge tags to insert dynamic post data (e.g., testimonial content, title, thumbnail).
- To view available merge tags:
- Select the Query Loop block and check the Block Settings > Reference panel, or
- Click the Post Merge Tags icon in the editor toolbar.
- Common merge tags we will be using include:
- #the_title#: Displays the testimonial title (client name).
- #the_excerpt#: Displays the excerpt (client position).
- #the_content#: Displays the testimonial quote.
- #the_thumbnail#: Displays the featured image (headshot).

Clear Default Merge Tags:
- By default, the Query Loop includes #the_title#, #the_excerpt#, and #read_more#.
- Select the Query Loop block, go to the Display Builder, and remove all default merge tags to start fresh.
Add the Testimonial Content:
- In the Display Builder, add the #the_content# merge tag to display the testimonial quote.
Style the Content:
- With the Query Loop Text block selected, go to the Settings > Advanced tab.
- Under Layout, set Padding to 10px for some breathing room.
- Go to the Border settings:
- Style: Solid
- Color: #d3d3d3 (light gray)
- Width: 1px
- Radius: 10px (for rounded corners)

Step 5: Create a Two-Column Layout for Testimonials
Add a Columns Block:
- Drag a Columns Block into the Query Loop’s Display Builder.
- By default, it’s set to a 50%/50% split.

Customize Column Widths:
- Select the Columns block and go to Settings > Layout.
- Choose the last layout option to enable custom column widths.
- Set the widths to 25% (first column) and 75% (second column) to accommodate the headshot and text.

Adjust Column Settings:
- In the Columns block settings:
- Set Gap to 0 to remove spacing between columns.
- Set Vertical Alignment to Middle for a balanced look.
Step 6: Add Content to the Columns
First Column (Headshot):
- Drag a Text Block into the first (25%) column.
- Add the #the_thumbnail# merge tag to display the client’s headshot.
Second Column (Name and Position):
- Drag another Text Block into the second (75%) column.
- Add the following:
- #the_title# (client name) – highlight and click Bold in the toolbar.
- Press Enter to add a line break.
- #the_excerpt# (client position).
Step 7: Style the Headshots
Make Headshots Circular:
- Select the Query Loop block and go to Settings > Advanced > Custom CSS.
Add the following CSS to style the headshots:
img {
width: 50px;
height: 50px;
border-radius: 100%;
}

Step 8: Preview and Test the Email
Preview the Email:
- Click the Preview button in the Groundhogg email editor to see how your testimonial section looks.
- Ensure the headshots are circular, the text is properly aligned, and the testimonials display dynamically.
Send a Test Email:
- Use Groundhogg’s Test Email feature to send the email to yourself.
- Check the email in different email clients (e.g., Gmail, Outlook) to ensure compatibility.
You Did It 🎉
Great job! You can download the template for this tutorial and easily import it into Groundhogg.
The Query Loop is versatile, supporting any custom post type. Think events, reviews, case studies, or anything else—let your creativity run wild!
If you have questions or want to customize this further, feel free to reach out to the support team.
Happy emailing!
Get started with Groundhogg:
To get started with Groundhogg, you can:
- Start a 14-day demo.
- Purchase a plan.
- Take the free quickstart course.
- Keep reading!
Have questions? Don’t hesitate to shoot us a message!